Another video I posted online a couple of years ago. This is my ORD Hadron 3D printer printing out a Tri-Lego.
Quick videos of my K40 laser cutter burning stuff
I posted these on YouTube a couple of years ago, but figured I’d also post them here:
Riley’s Dresser
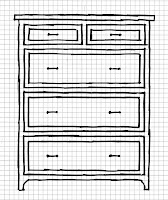
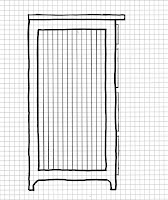
Sorry for not posting in a while, but I’ve been busy working on a dresser for my daughter. While she was little we have been using a small plastic dresser from Ikea. She’s outgrown it and something had to be done about the mess that was spilling over into her room.
The dresser is pretty simple and made of pine. Like most woodworkers, I’m sneaky and put a secret (not so secret anymore) compartment in one of the drawers. I also posted my sketches and I’m more than happy to make the plans more detailed if anybody wants them. For the most part the sketches are to a 1 inch scale.
I ended up using a lock joint on the drawers. Likely should have done a dovetail, but I haven’t gotten the purchase approval for the dovetail jig that I’d like to buy. Plus, this was a pretty simple dresser…dovetails may have been overkill. It turned out pretty nice and matches the bed I made a few years ago.
|
|
|
|
|
|
|
|
|
|
|
|
|
|
|
Making things with your kids
I stumbled across a really cool website this weekend and figured I would share. It’s called DadCanDo.com. It has some awesome content and well illustrated downloads of all kinds of activities you can do with your kids. I have a few projects in mind and I may try their illustration format to document them. Most notable, the kids and I have been encasing various toys (Rocks, Legos, Bugs, etc.) in Casting Resin. That maybe a good project to post here. Thanks to this Instructable, I’m going to try illustrating the instructions rather than take photos.
Toolbox CNC Controller
 I’ve been debating on what to put all of the electronics in, and several weekends ago I bought this old toolbox at a garage sale for $2. Turns out it holds everything, plus I still have room for the tool tray. I imagine I’ll store some CNC tools in there…Dial Caliper, Router Wrenches, etc.
I’ve posted a ton of pictures below of the build in case you want to do something similar. You will also notice some pictures of a laptop cooler. I found this at the local Fry’s on sale for about $5. I managed to dismantle this and retrieve 2 5v fans (with temperature and speed control.) Fan Grates, USB Cables, 5v power supply, plus a USB Hub.
I used the fans to help cool the toolbox and I plan on installing the USB hub into the toolbox as well. I also used XLR or Mic connectors to attach the steppers to the electronics. I had a difficult time finding these from a domestic supplier. I ended up buying from Futurlec, which ships from somewhere in Asia. It was a great price and exactly what I needed. I would certainly buy from them again. These connectors are great as they allow you to screw in the connector which hopefully prevents yanking them out while the steppers are running, which appears to be very bad for the electronics.
 |
|
CNC Electronics Wiring
 I just wanted to post some photos of the electronics wiring. I thought the documentation was a little lacking, so I figured some detailed photos may help others. Just post in the comments if you have any questions.
Overall, I’m really happy with the kit even though the documentation is a little lacking.
I’ve also attached a movie, just in case you want to see some motors spinning.
 |
|
Pick Box
 I’m not quite sure how to describe the project. I was at my local electronics surplus store and found these cool little analog counters and wasn’t quite sure what to do with it. I thought about making an analog hit counter for this website, but then again it probably wouldn’t be fun to watch it tick change once every couple of weeks.
 So I eventually ended up just putting it in a nice Black Walnut box with Wenge accents. The build photos are in my Flickr set. So far this has been pretty fun…people have a hard time walking by it without hitting the button a few times. At one point I debated on putting a loud buzzer in the box…I opted not to do that and I’m glad. Occasionally my kids will push the pick button 1000 times to see it turn over…even after warning them many times that going past 999 would undo space and time as we know it.
CNC Motors
A few weeks ago, I took the plunge and ordered the stepper motors and drivers. This was the most expensive part of my build and cost roughly $400 for the kit. In total, I’m figuring the machine will cost about $700 when finished. That includes all hardware, wood, motors, and controllers. It doesn’t include the computer that will run it as I’m just using something I had around.
After a bunch of research I elected to buy the following kit from Keling Incorporated:
CNC 3 Axis Package with 425 oz-in motor and KL-4030 Bipolar Driver with 36V /8.8A Power Supply
After hooking everything up, I thought the documentation was a little lacking, but there was enough information on the internet to get everything hooked up fine, but I really had to concentrate. I’ve posted a few pictures of the ‘unboxing’ and will be posting some pictures of my enclosure. I plan on putting all of the electronics into an old toolbox.
 |
 |
CNC 4
Just posting some more pictures of the build. The following pics show the Lower Torsion Box assembly. I also show how I attached the ends to the Torsion Box. I decided to bolt them on for now. I will likely glue and bolt them on later.The Torsion Box was just assembled with wood glue and staples. Let me know if you have any questions in the comments.
CNC 3
 I took these pictures some time ago, but just now posting. These are basically the construction of the X axis assembly along with some of the bearing blocks.
Lots on the forum are tapping the mdf and using screws, I decided to go with Conformant Screws. I’ve used these on other projects involving MDF and the work really well. You just need to make sure you drill the holes straight.
McFeelys.com has a great starter set. I’d recommend that for this project or any other involving MDF boxes.
 |
 |
 |
 |


